


iPhone 5S Upper Component Cable Replacement

Send this link via e-mail
|
Tweet |
|


Step 1 - SIM Card
There's a small hole in the SIM card tray. Push either a SIM card eject tool or a paperclip into it.
Press the tool in order to eject the tray. You may need to use some force to do this.

Step 2
Take the SIM card tray assembly out of the iPhone.
Make sure that the SIM card is in proper orientation (in relation to the tray) when you're placing the SIM card back.


Step 3 - Logic Board
Back to top
Lift the button assembly cable from its socket on the logic board with a spudger.
Make sure that you lift the connector and not the socket itself. If you lift the socket, you risk breaking the connector completely.


Step 4
Lift the Lightning connector cable from its socket on the logic board with a spudger.
Make sure that you fold the Lightning connector cable so that it's not in the way of the logic board.


Step 6
Disconnect the rear-facing camera cable from its socket on the logic board, using the flat end of a spudger.


Step 8
There are seven screws on the logic board. You need to remove them.
One 2.4 mm Phillips screw
Two 2.3 mm Phillips screws
Four 2.8 mm Phillips screws
Remove all of these with a small flathead screwdriver.


Step 9
Lift the logic board up so that you can grab it with your fingers. Do this with a plastic opening tool.


Step 10
Separate the logic board and the rear facing camera only slightly.
The logic board is connected by an antenna cable on the back, so don't remove it immediately.
Turn the logic board toward the battery (similar to turning a page in a book).


Step 11
Disconnect the antenna cable on the back of the logic board with the flat end of a spudger.
Take the logic board off the iPhone.


Step 12 - Rear Facing Camera
Back to top
Flip the rubber camera cover out of its clip with a pair of tweezers and move it towards the outside of the rear case.
Do not try to remove the cover completely, because it is attached to the rear case. You only need to flip it open.


Step 13
Disconnect the rear-facing camera cable connector from the logic board with a plastic opening tool.
Pry up only on the connector - not the socket.


Step 14
Take the rear-facing camera off the rear case.
When you start the reassembling process, make sure that the camera cable is shaped like a “U" so that it can slot in behind the logic board.
In case the rubber camera bumper shifts, replace it before starting to reassemble your iPhone.

Step 15 - Camera Bracket
Back to top
There are two 1.6 mm Phillips screws securing the rear-facing camera bracket. You need to remove them.


Step 18 - Battery (2)
Back to top
Push the tip of the spudger into the hole in the battery adhesive tab located near the headphone jack.
Pry the tab up somewhat and unfold the tab from its recess. Do this with the spudger.


Step 19
Lift the adhesive tab up from the phone.
Separate the two white adhesive strips by cutting the black battery adhesive tab between them.


Step 20
Pull the tab the furthest in evenly straight up.
Do not twist the tab, but try to keep the adhesive strip as wide and as flat as possible. If the adhesive bunches up, it might tear.
Do not pull the tab against any of the components of the phone. This may damage the adhesive, which would in turn tear the strip.


Step 21
Carefully pull the tab around the corner of the battery. Make sure you pull evenly.
Separate the tab from the battery once you round the corner, to avoid the sharp corner.
In order to free the strip from the phone, pull it along the side of the battery.


Step 22
There's an outside battery adhesive tab which you need to pull straight up. Be careful while you're pulling it around the corner of the battery.
In order to free the strip from the phone, pull it along the side of the battery.


Step 24 - Vibrator
Back to top
You need to remove two Phillips screws from the vibrator bracket:
One 1.7 mm screw
One 2.5 mm screw


Step 26
There is one 1.7 mm Phillips screw securing the vibrator to the rear case. You need to remove it.
Hold the screwdriver at a slight angle and be careful not to strip the screw while you're removing it.


Step 28 - Upper Component Cable Replacement
Back to top
There are three Phillips screws securing the volume button and ringer switch brackets to the side of the rear case:
One 1.9 mm screw
Two 1.6 mm screw


Step 29
Lift the ringer switch bracket slightly from the side of the rear case. Do this with the tip of a spudger.
Take out the ringer switch.
When you start the reassembling process, make sure that the switch is placed correctly. The red line should be located at the top of the button. The notch in the back of the ringer switch button need to be in the same place as (and mate with) the mechanical switch on the cable.


Step 30
Lift up the volume button bracket from the side of the rear case with a spudger.
Take out the volume buttons.
When you start reassembling your iPhone, check if the “+" (volume up) button is in the hole closest to the ringer switch.


Step 31
Take the rubber rear-facing camera cover out of its slot in the rear case with a pair of tweezers.

Step 32
There is a 1.3 mm screw securing the logic board grounding bracket to the rear case. You need to remove it.


Step 34
There's a 2.1 mm Phillips screw securing the contact clip and the power/sleep button bracket. You need to remove it.


Step 35
Take the contact clip away from the iPhone.
When you start the reassembling process, make sure that the bracket is properly seated between the rear-facing camera flash and the top edge of the iPhone's case.


Step 36
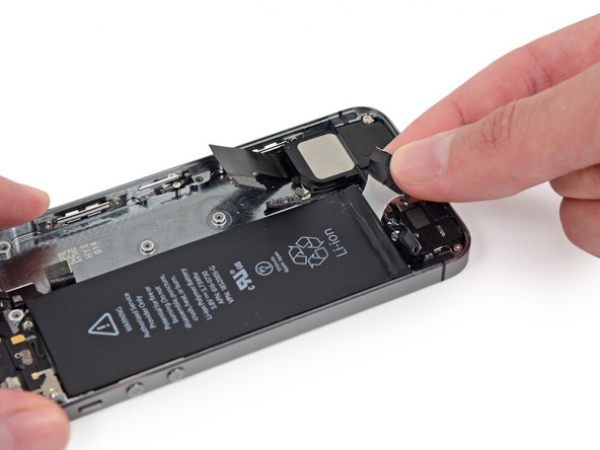
Insert the flat end of a spudger under the upper component assembly cable. This will free it from the rear case.


Step 37
Move the flat end of a spudger under the part of the cable close to the volume control buttons.


Step 38
Free the adhesive that's securing the vibrator contact part of the upper assembly cable from the rear case. Do this with the tip of a spudger.
Use the tip of a spudger to push the flash assembly free in case it doesn't come out of its hole in the rear case.


Step 41
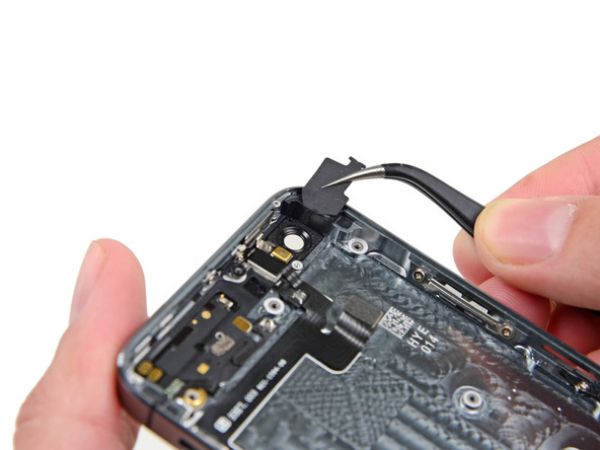
Push the power/sleep button slightly in the iPhone with the tip of a spudger.
Remove the power/sleep button using a pair of tweezers.
When you begin the reassembling process, make sure that the orientation of the button is correct. Those two “L" shapes need to be upside down and the metal bar folded on the top of the button.


Step 42
There's a power/sleep button bracket hinge holding the button in the iPhone. Unclip it from its post.

Step 43
Take out the upper component assembly out of the iPhone.
If, while you're doing this, you come across any resistance when you lift the cable, stop what you're doing, because the cable has a lot of delicate ends that you can tear easily. Move the spudger underneath the entire cable and try lifting it up again.